
Microlearning is a great way to provide users with a way to develop a focused skill in minutes. Let's get our hands dirty for this blog by creating a microlearning example in Lumi. After a recent trip to Italy, I realized I don't know much about coffee, specifically espresso drinks. I've been to Starbucks and local coffee shops but let the cappuccinos and lattes go by in a blur. Plus, if it comes frozen, drizzled in chocolate, and doused with a mountain of whipped cream, is it really coffee?

Anyway, back to the point. Today, we will use Lumi to create a microlearning module about coffee. Yes, I agree there are many more serious things in life to learn about, like quantum physics and cybersecurity, but I'm the one running this, and today we are going with coffee. At the end of the microlearning, we want the learner to identify six types of espresso drinks properly.
Lumi is a free resource with lots of options for creating interactive content. Lumi lets you create interactive H5P (HTML5) packages. The H5P interactions can be seamlessly embedded in websites, learning management systems, or other educational materials.
I'm going to create a microlearning module using the Column feature. A Column lets you combine almost any activity available in Lumi into one consecutive activity. We can use this feature to create activities that gradually build upon what the user takes away from the content.
The first activity will include the core learning materials, the essential knowledge we want the learner to acquire. I will create content combining text accompanied by illustrative images, but this section could be anything. We could make a video delving into the history of coffee or maybe a presentation that the learner can explore.
We will follow this with a drag-and-drop exercise where the learner can practice identifying coffees using the diagrams in the previous interaction. Finally, we will present the user with a scenario allowing them to apply what they've learned. Let's get started.
Graphics Selection
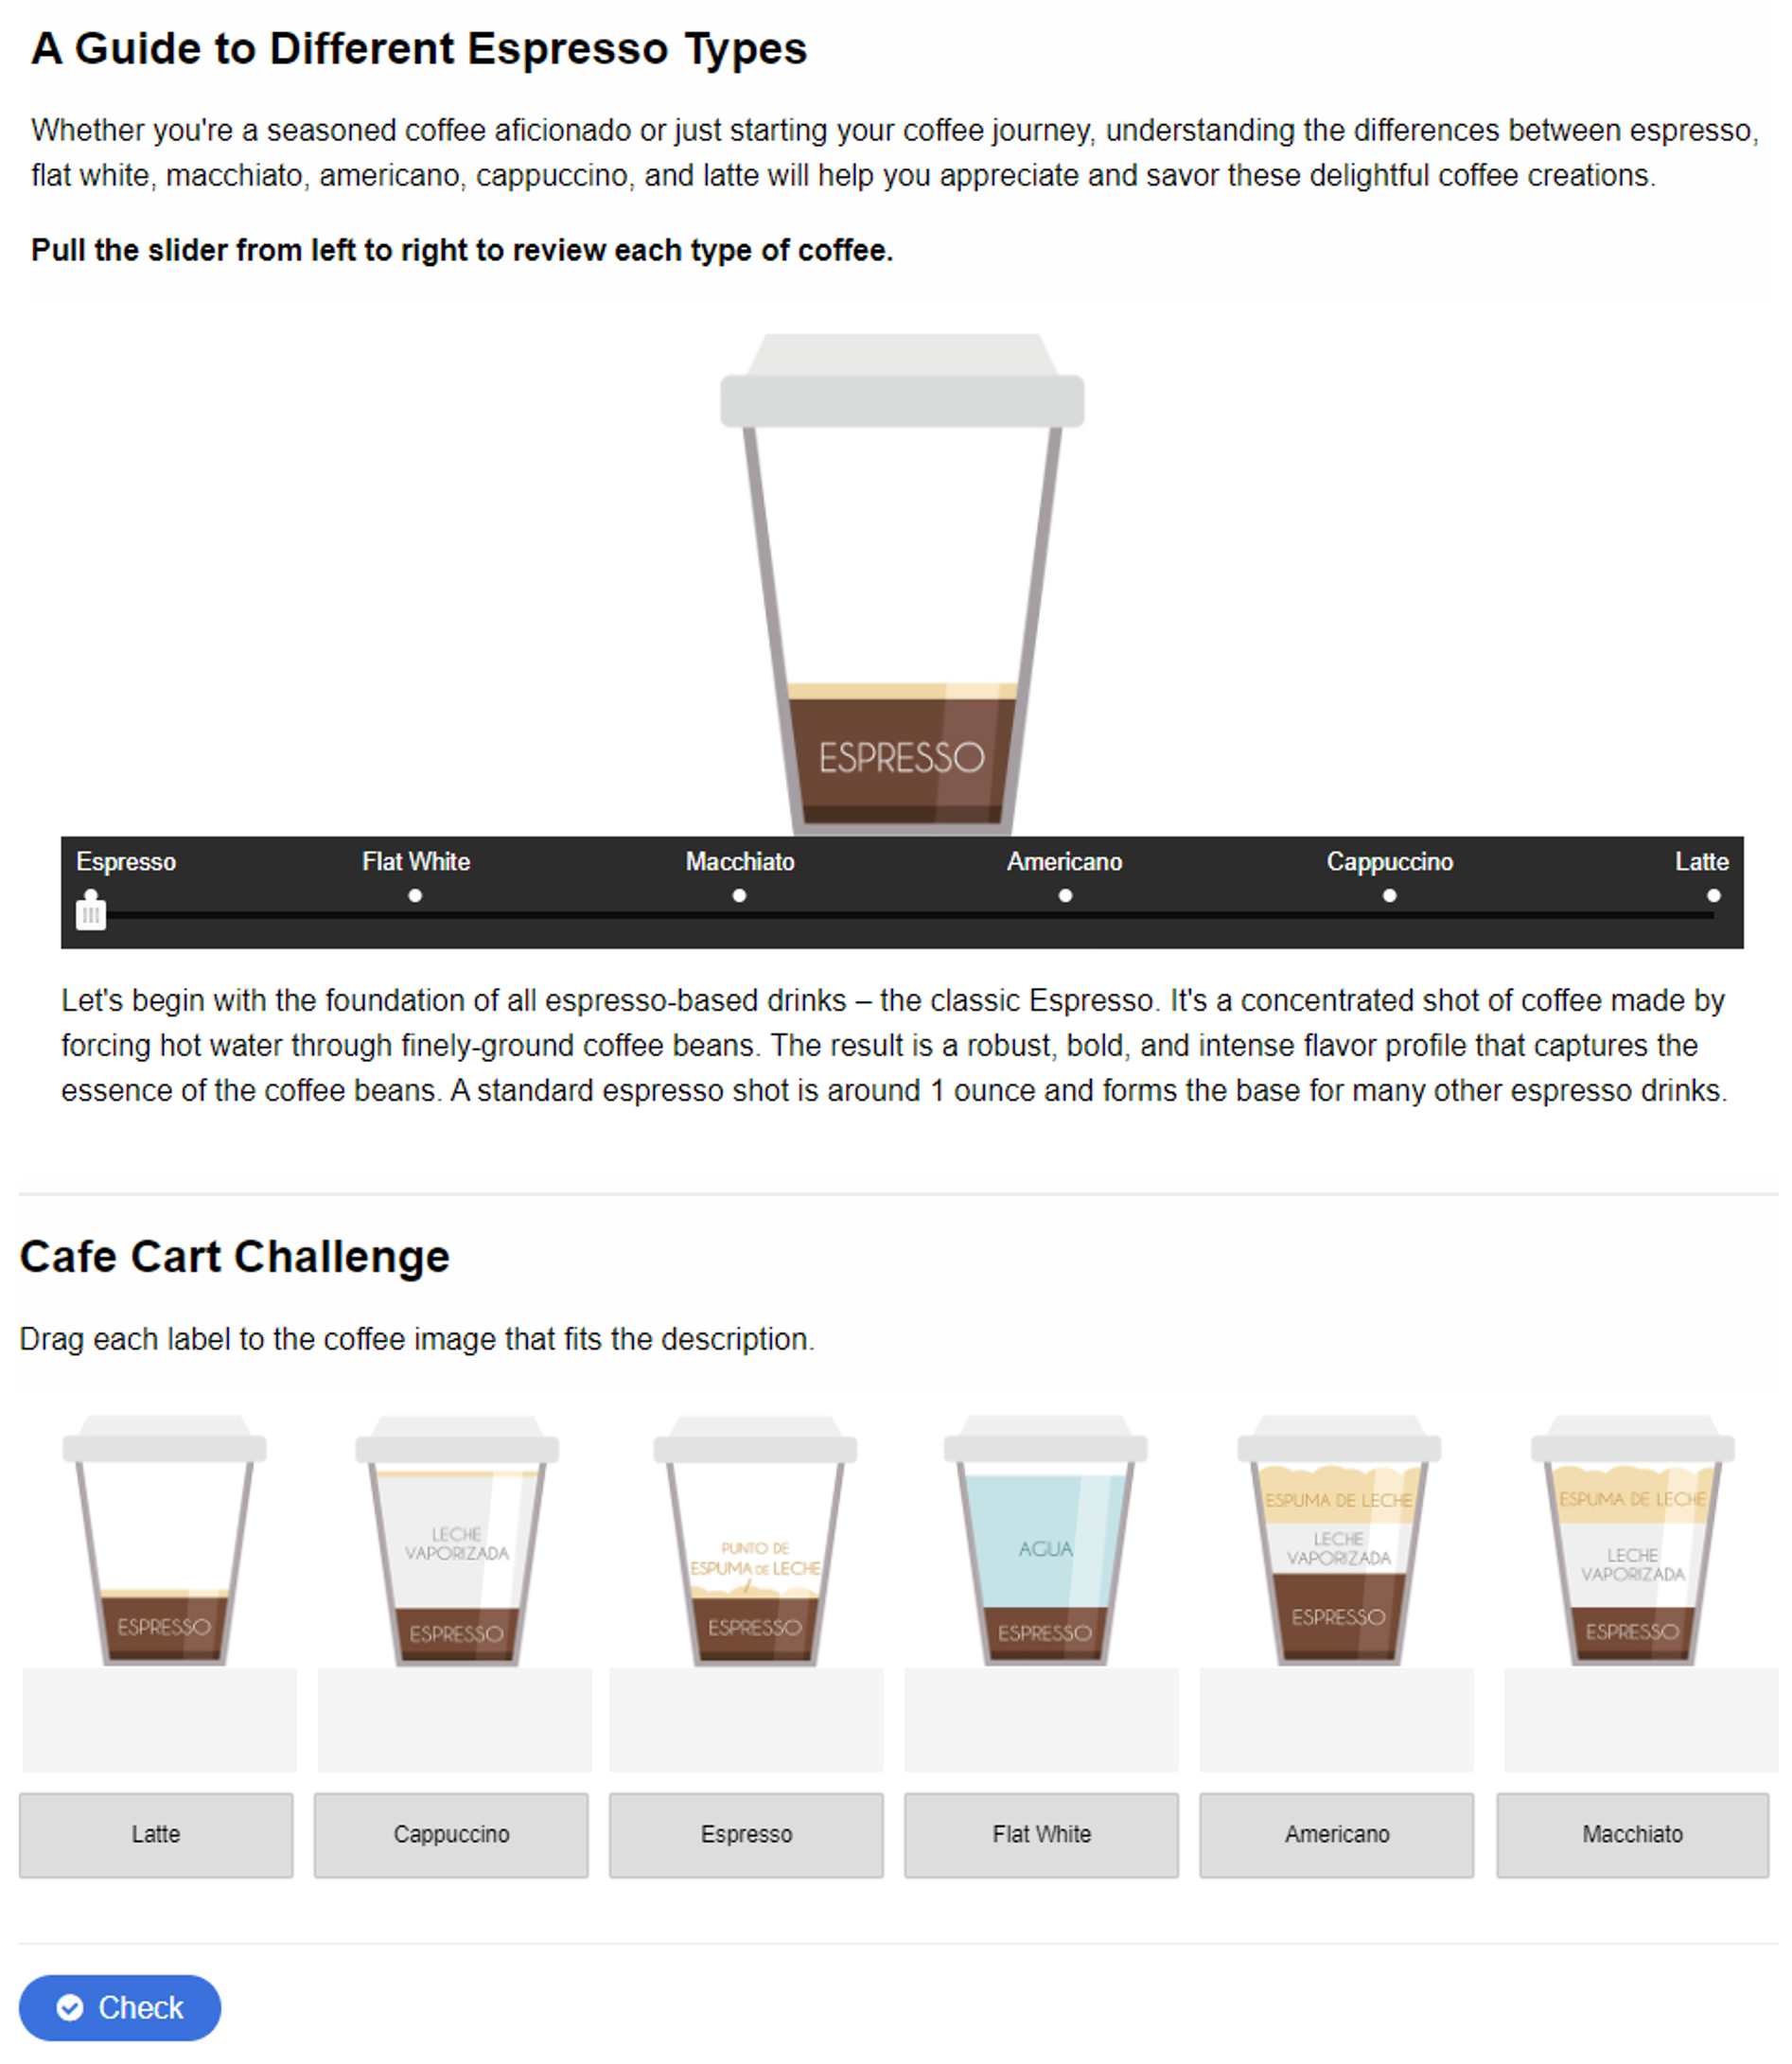
I chose a coffee infographic from some stock images because I like that it gives a quick visual reference to the types of coffee drinks. Maybe I shouldn't have chosen one in Italian, but here we are. I like bringing back the same images to make the user feel at ease, continue the flow, and trigger memories from when they first encountered the information.

Introduction
Sometimes, I like to use the Column in Lumi even with a single activity because adding a text field above the exercise gives you many options. You can format the text, explain the activity, and even use images. So, the first item in the column will be a simple text panel introducing the first activity.

Activity 1: Image Blender
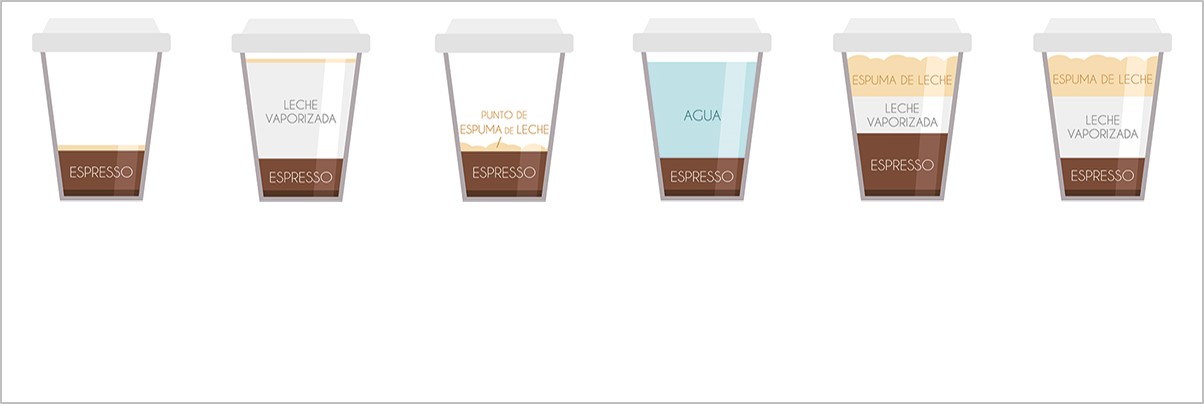
Next, we will create an Agamotto (Image Blender) activity. I chose this format because it helps us show a series of pictures that work well to compare the types of coffee. Along with each image, we will explain the different coffee types, outline specific ingredients, offer background insights, and describe each coffee's unique flavor profiles.
I could not find any information on why they would name this activity "Agamotto" other than some vague reference to Dr. Who. If anyone has any information regarding this, please leave it in the comments. Again…back to the point.
I've found that image size in Lumi makes a dramatic difference in how the content appears on a user's screen and how the interaction displays in general. Here is a test display of one of the images I posted in the activity before editing the size.
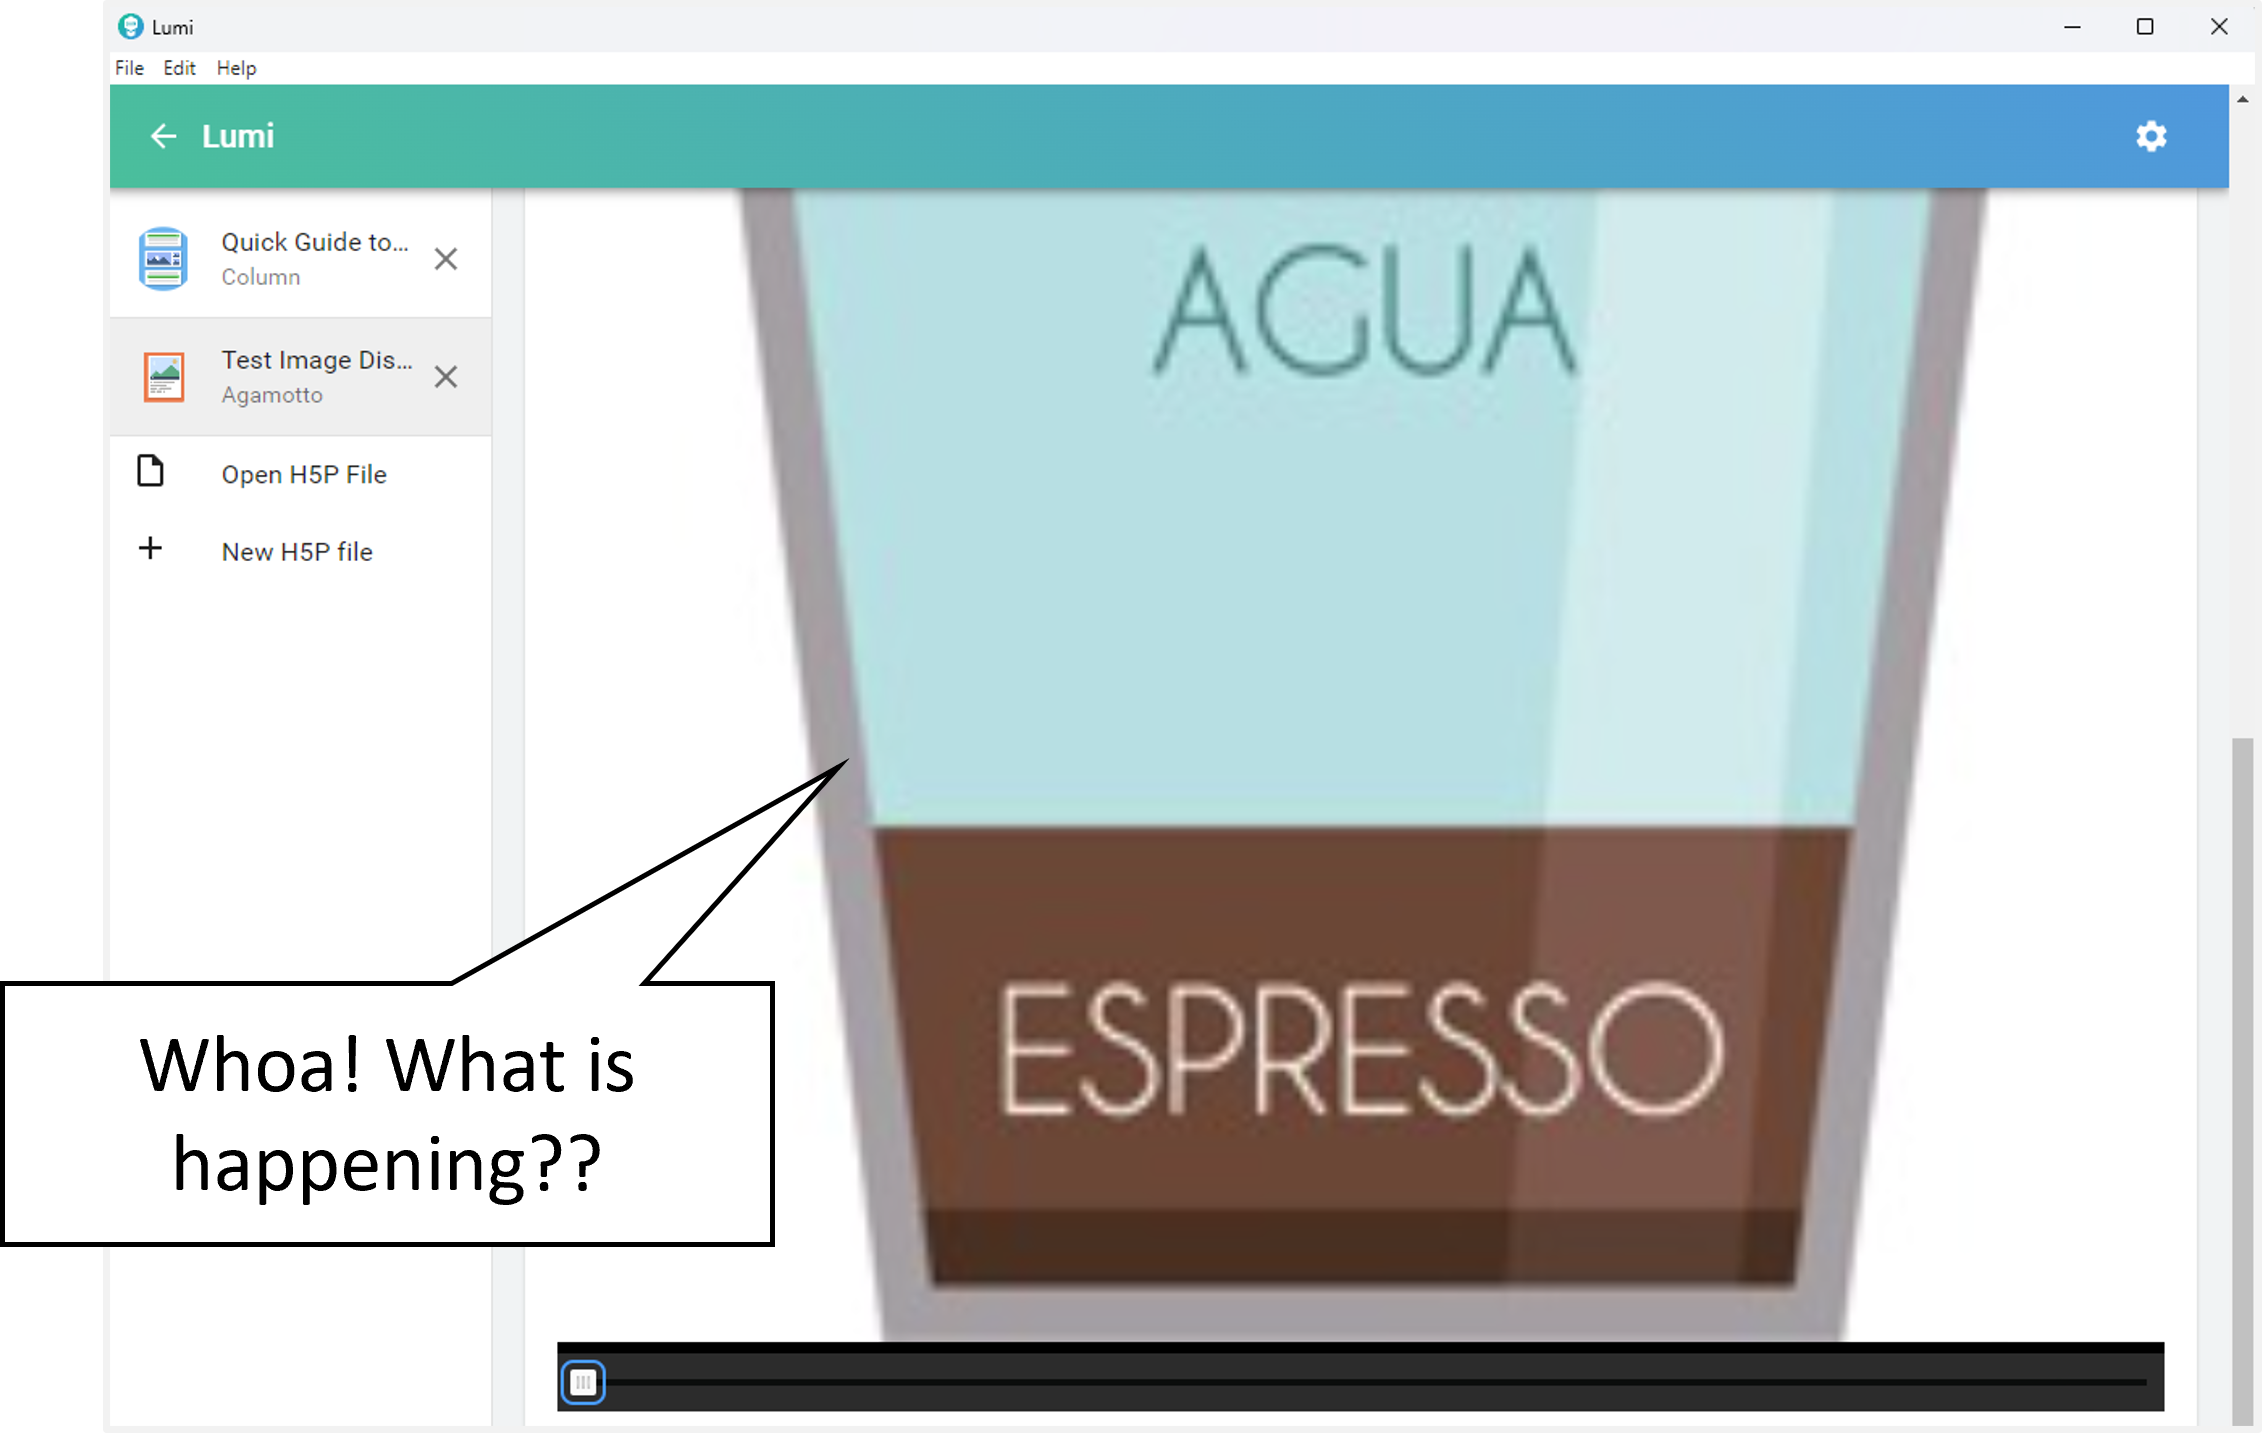
As you can see, the picture overwhelms the page, and you need to scroll to see the entire image creating an unfriendly user experience. Your results may vary, but I have found that images 1200 pixels wide generally leave enough room on the screen to view the image within most activities.

After seeing how large the image initially appeared, I sized the images for this activity to 1200 x 400 pixels, leaving blank spaces on each side of the image so they display centered on the screen.
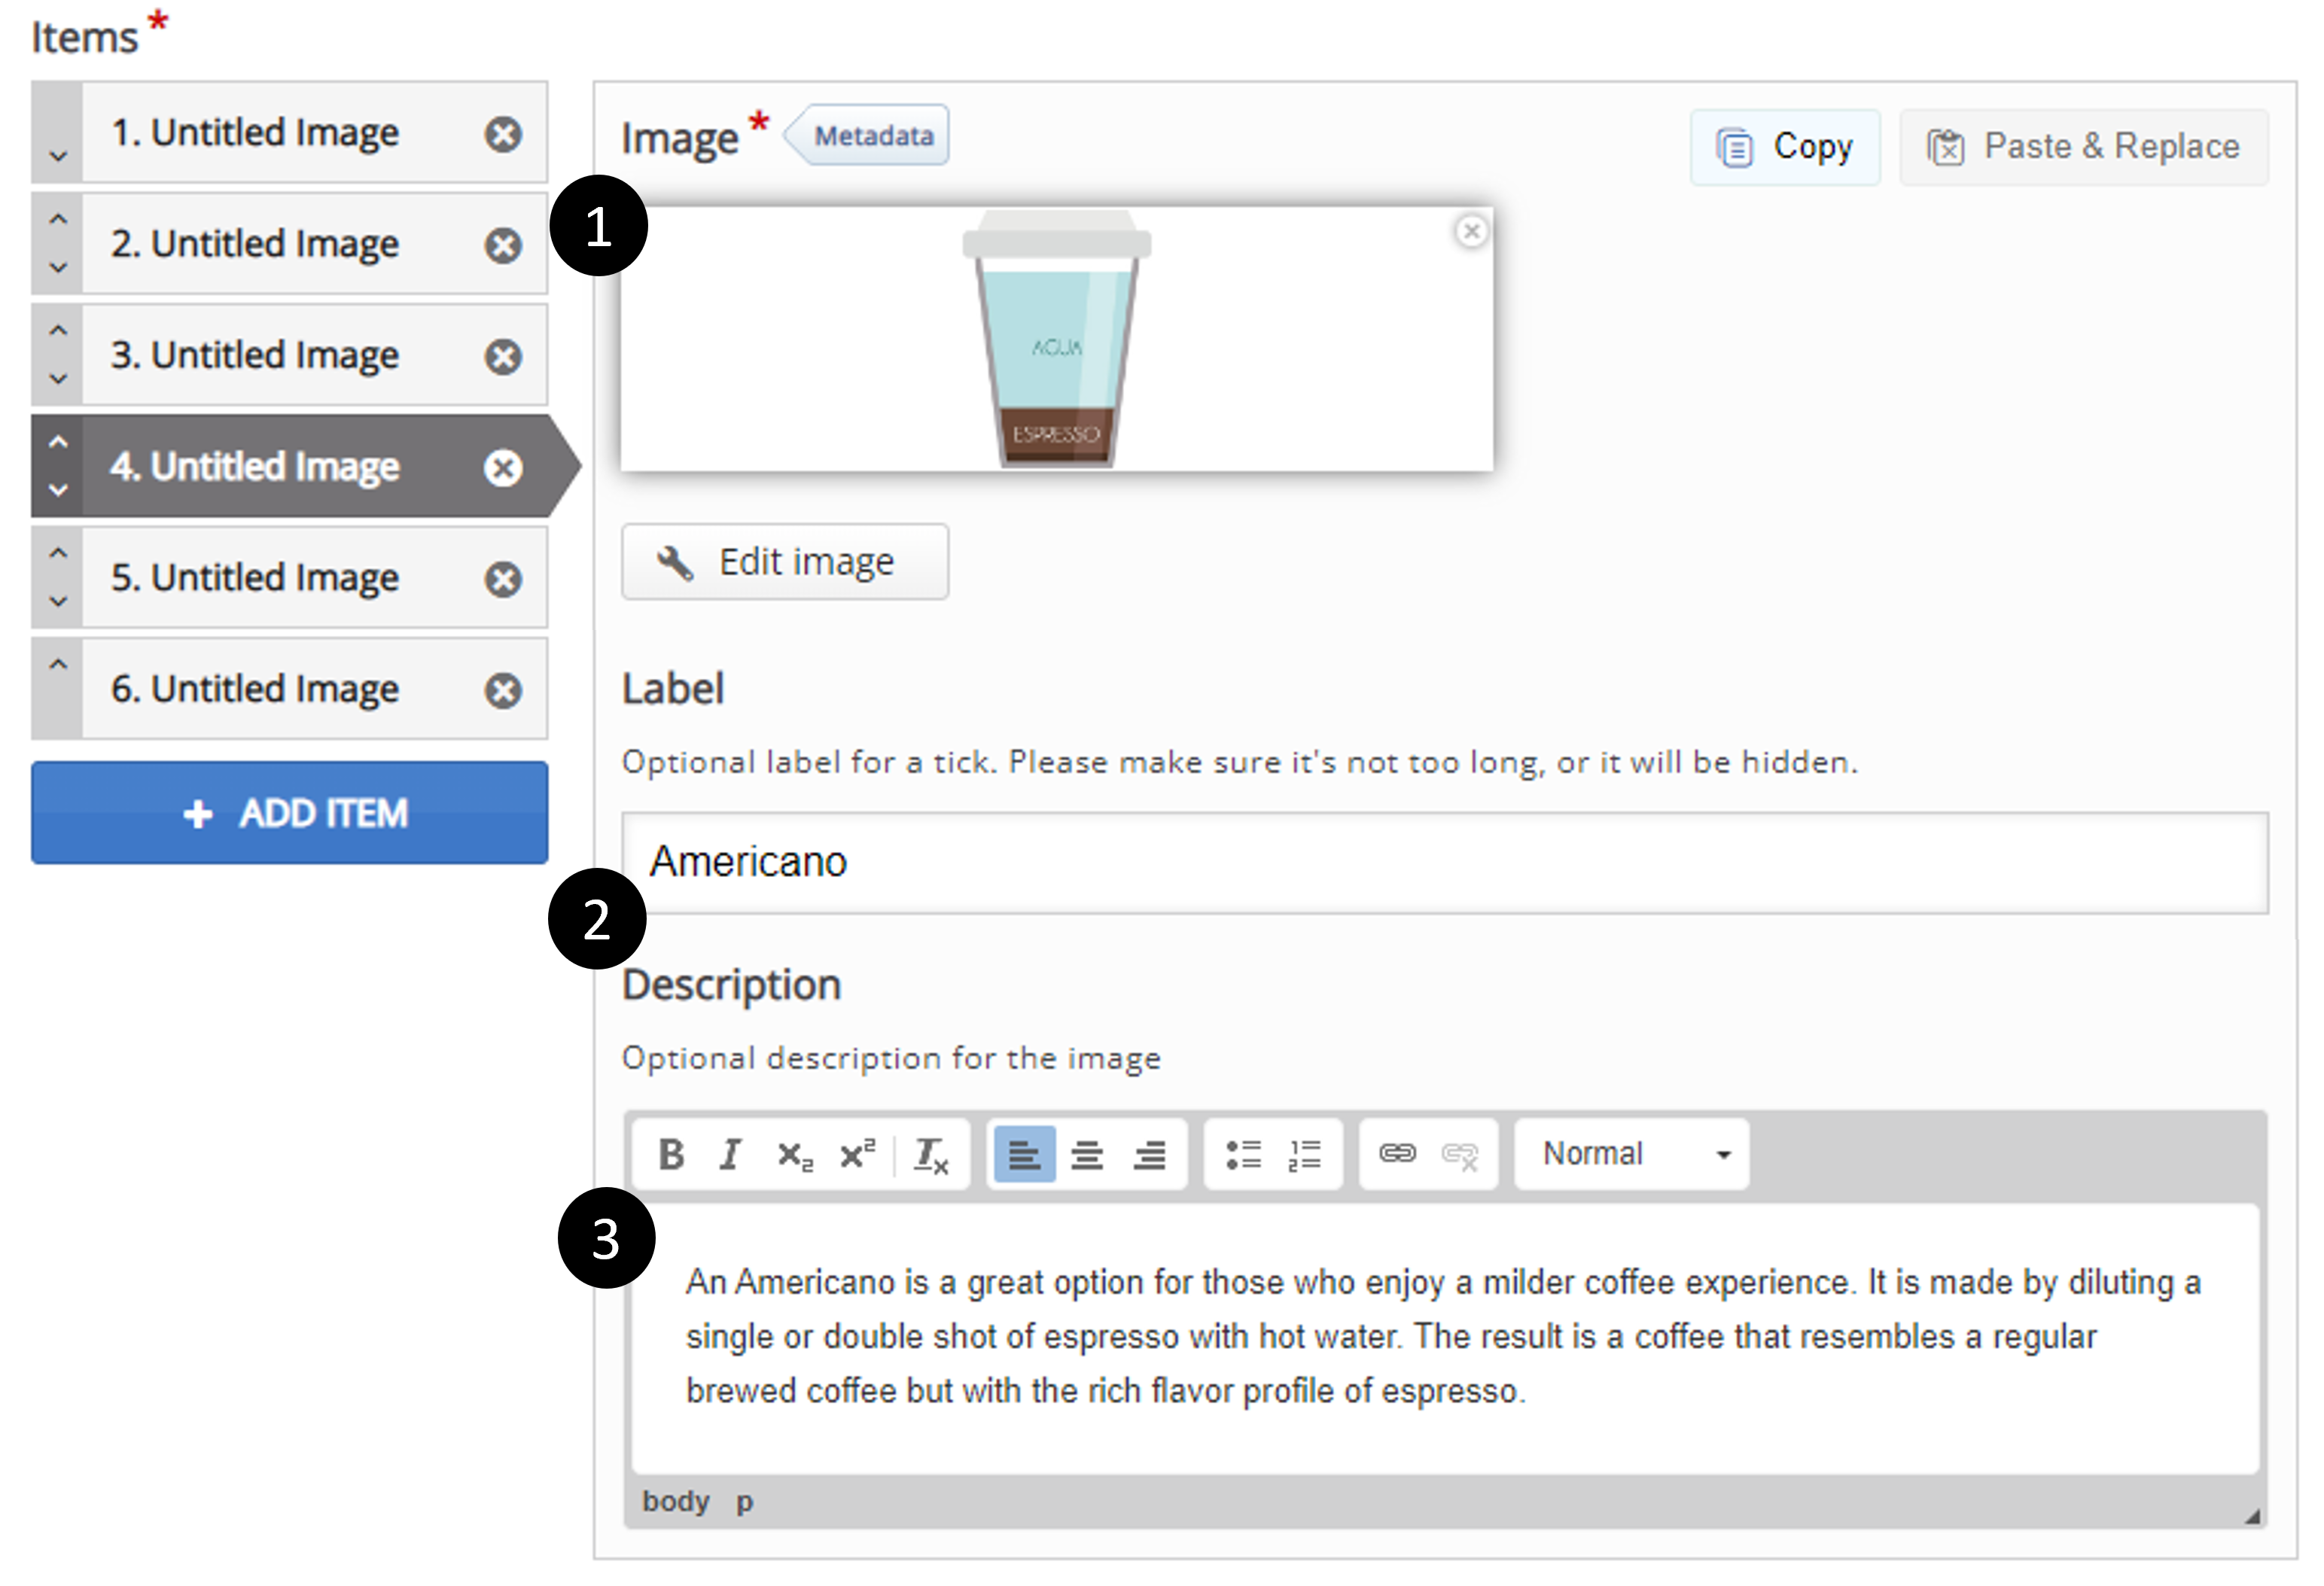
After using the "+ ADD ITEM" button to create each section, we will proceed to populate content for each of the coffee types we want to include:
1. Add the edited image to each section.
2. Provide a label title on the screen above each tick mark.
3. Write the description.
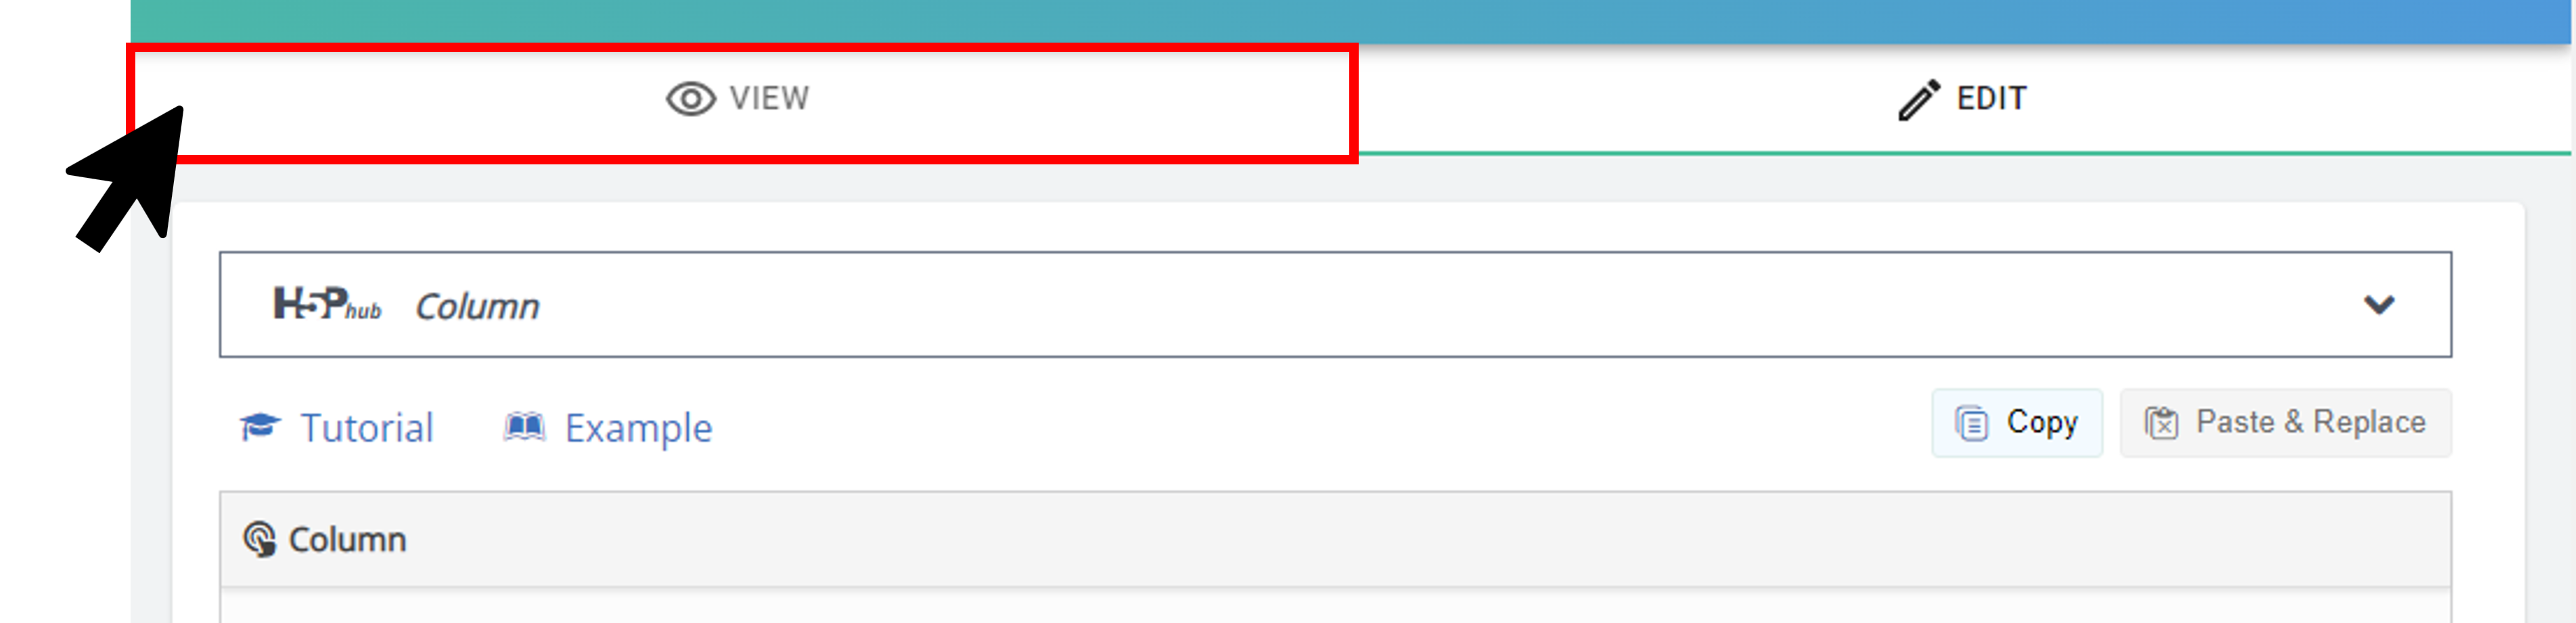
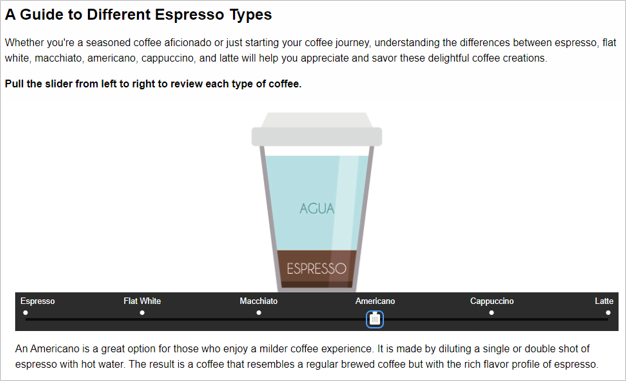
After completing each section, previewing your work using the VIEW tab at the top of the Lumi workspace is a good idea.
Previewing the exercise, you will see a different image and description appear as you move the bar over each option.
Activity 2: Drag and Drop
So far, our column has one text field and one activity. Let's add another text field to explain what will happen next and give the user some instructions for the exercise.

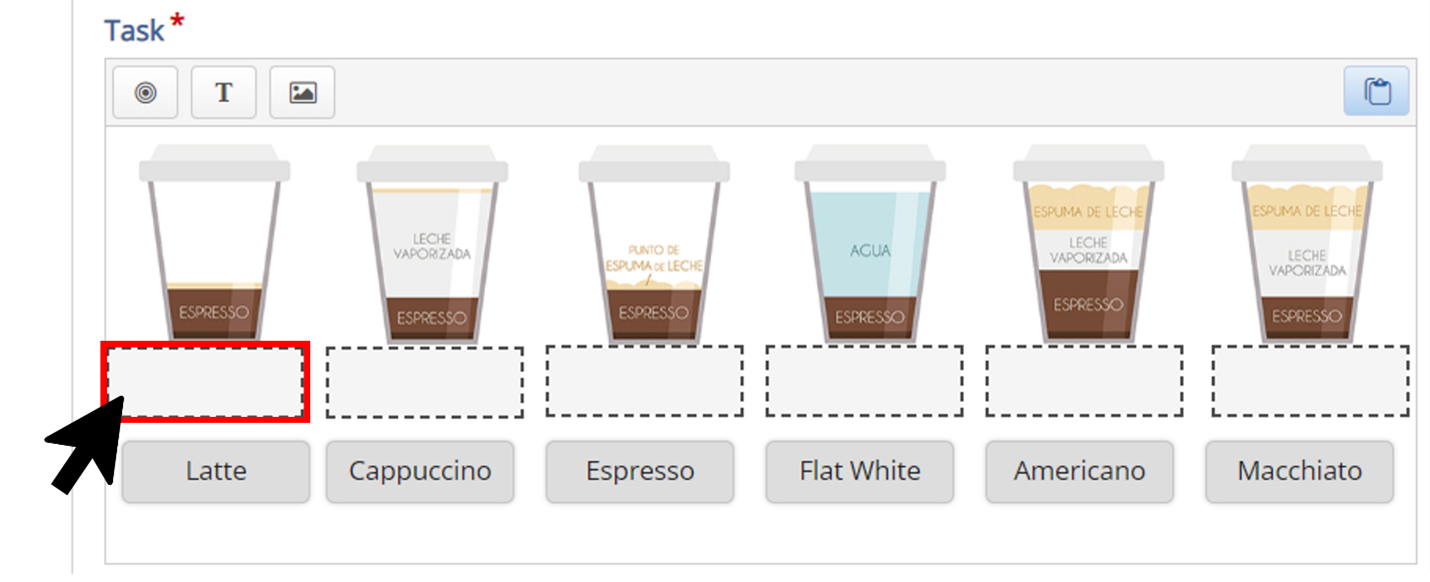
We will use the same image set we used for the Image Blender for the Drag and Drop exercise. When editing an image for Lumi Drag and Drop, allowing room for the draggable options to display below the graphic is important. The image is 1200 pixels wide with a height of 400 pixels. Notice the extra white space below the graphic. This blank space will allow for drop zones and drag options.
Next, we add this image as the base of the drag-and-drop activity:
1. Upload the image file.
2. Reset the parameters of the task size to reflect the image size. Since the image size is 1200x400, this is what we specify for how large the play area should be.

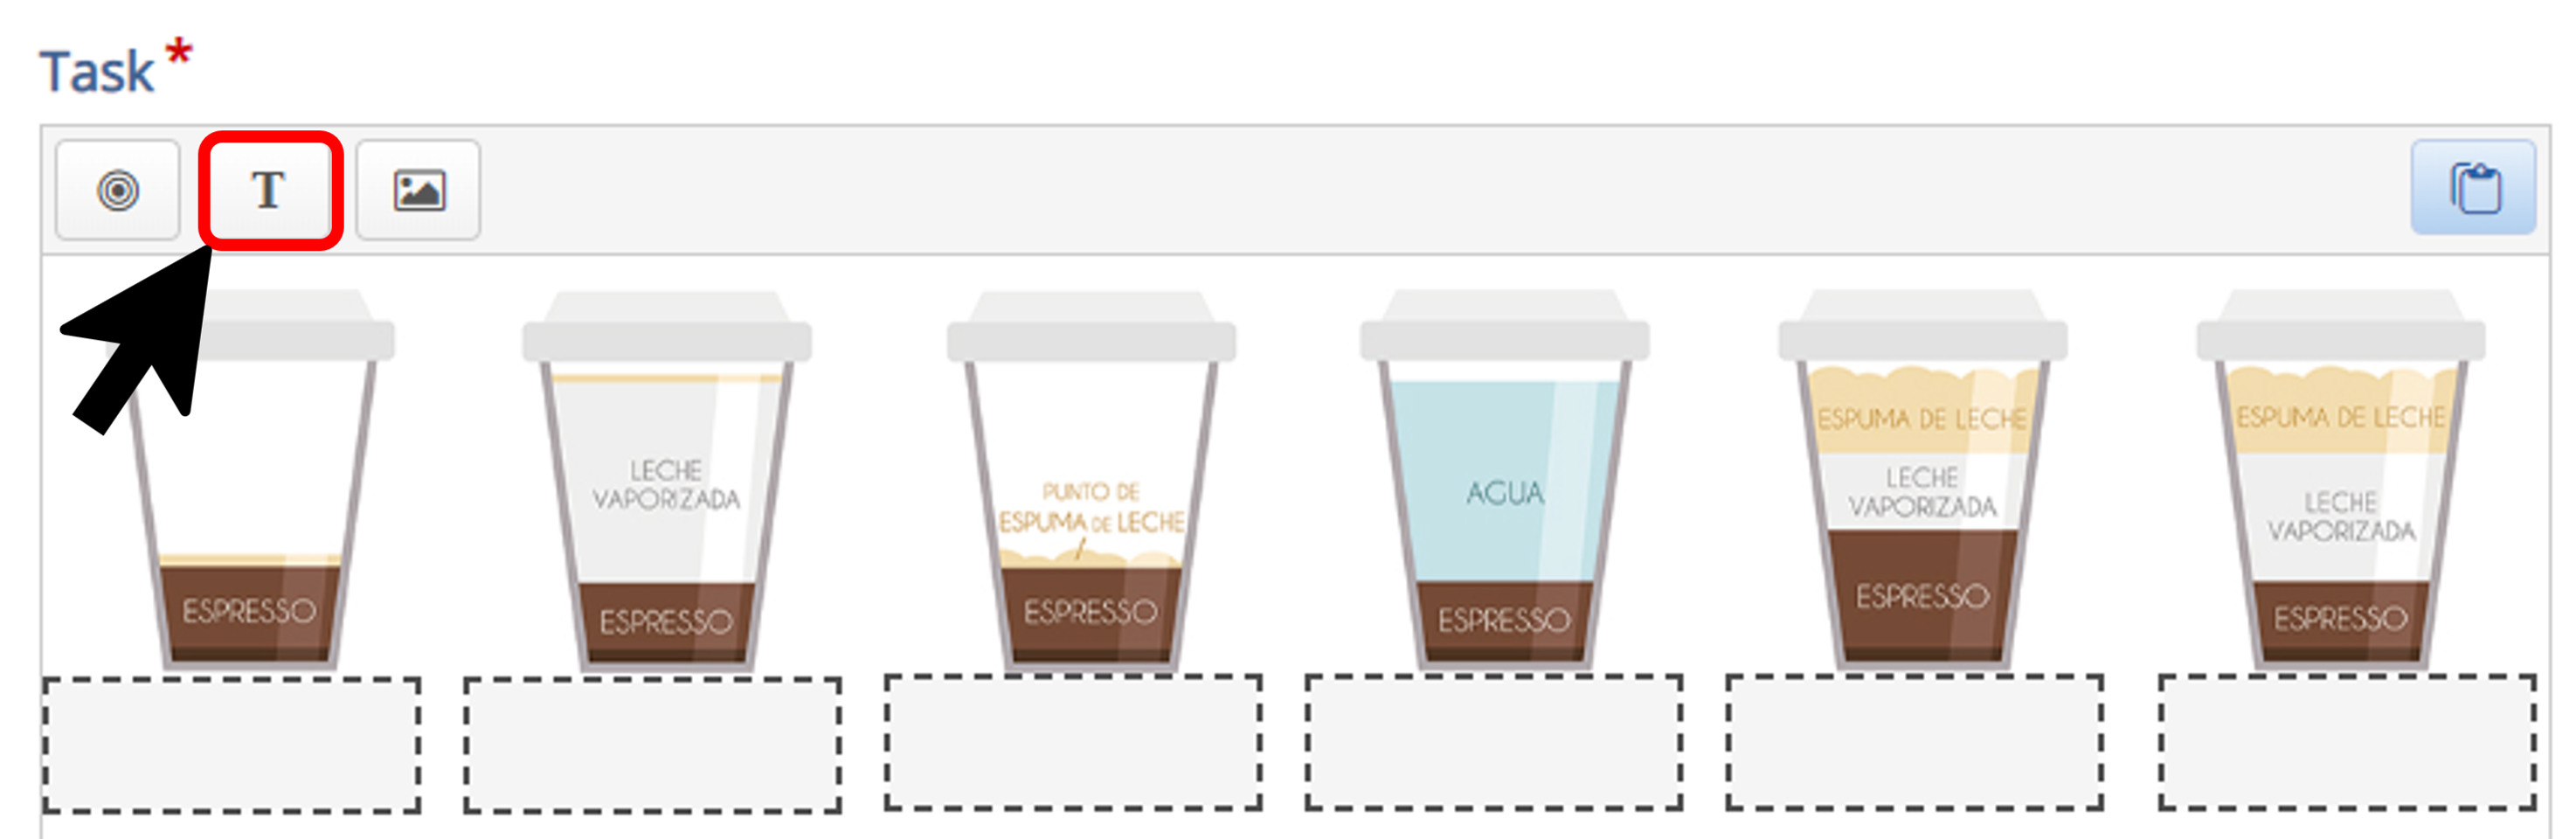
Once you've selected your image and set the Task size, click the Task tab to start building your interaction. The first step in creating this activity is to add the drop zones. Click the drop zone icon at the top of the Task menu.

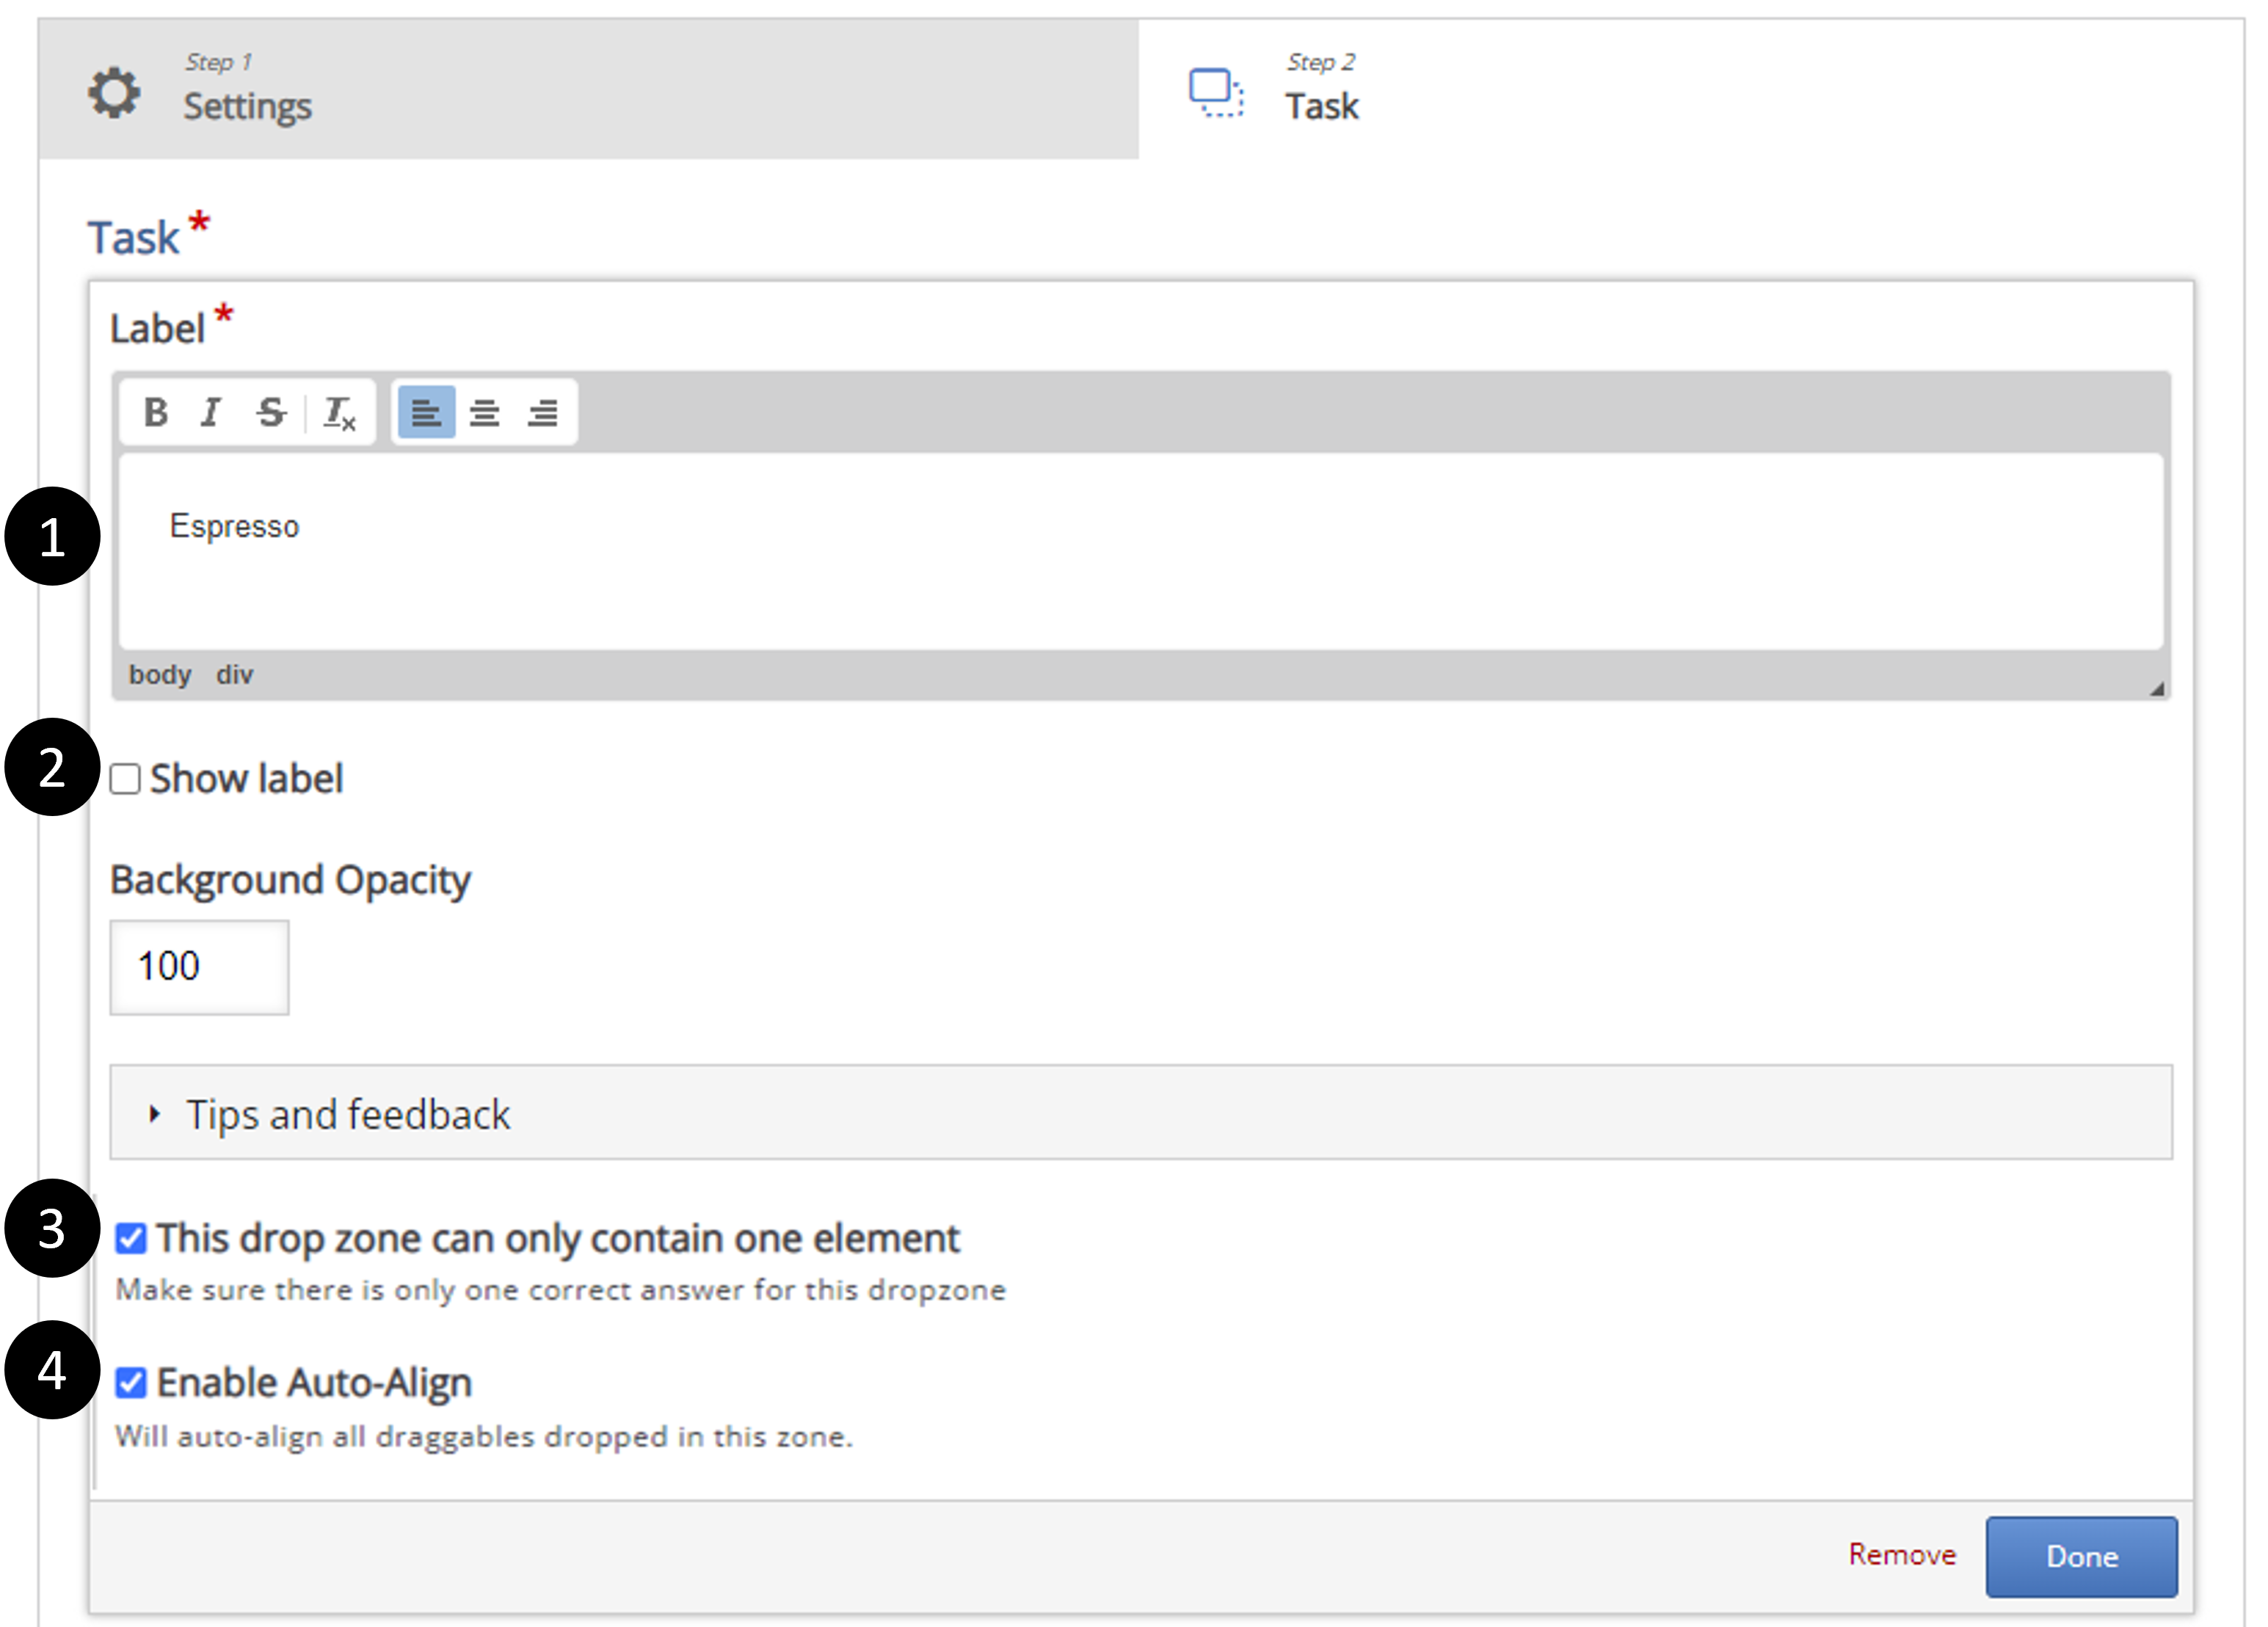
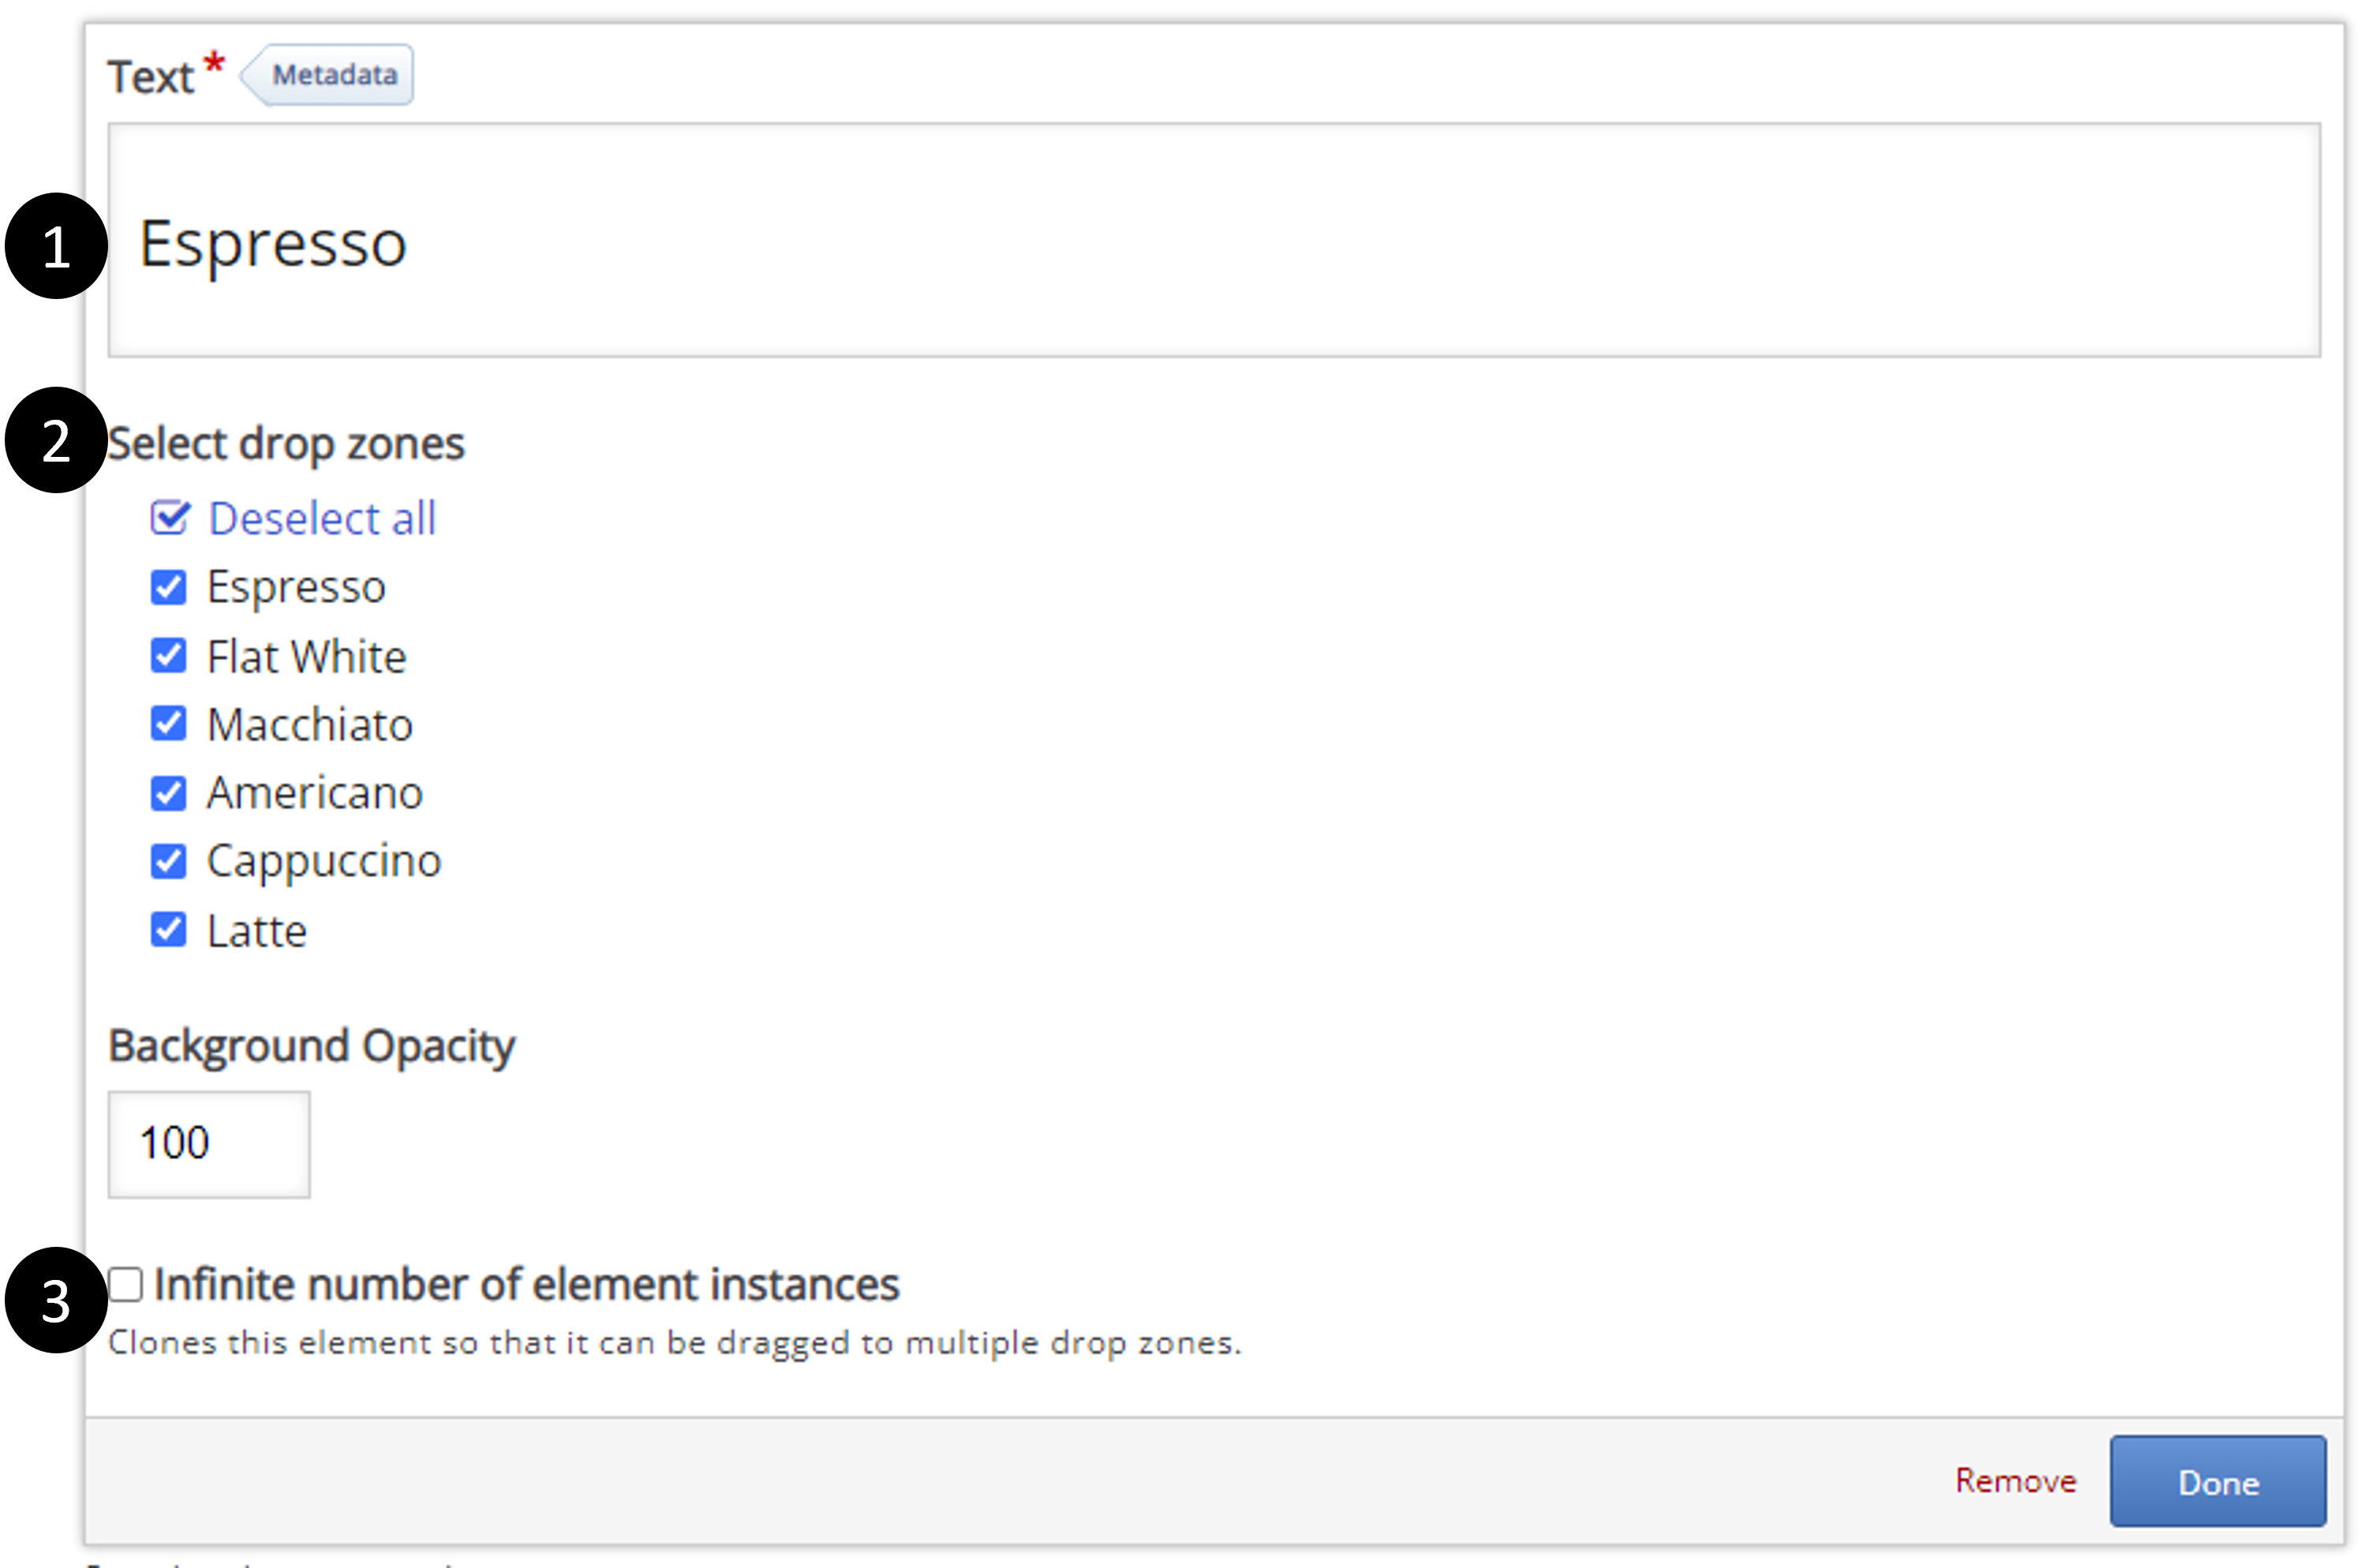
Now you can create and place each of your drop zones:
1. We give the first drop zone a title in the Label section.
2. We are not going to choose the option to show the label.
3. Each drop zone will contain only one element, so we will select that checkbox.
4. Auto-Align will pull each label to the same location in the drop zone. I like to use it because it makes it easier for the user not to feel like they need to work to align the item into the drop zone precisely.
The drop zone will appear in the Task window when you click Done. Once we have all the drop zones in place, we can add the draggable elements. For this exercise, we will add text labels and select the Text icon at the top of the Task menu.
In this section, you will add the text for each draggable option and define which drop zones will accept this item:
1. Add the label for the first element, "Espresso."
2. For this instance, we want each drop zone to accept all the draggable options. Under Select drop zones, click the checkbox to Select All, allowing the user to drop the item in any of the zones.
3. Since we only need one instance of this label, we will not select the checkbox for Infinite number of instances.
Clicking Done will add your draggable item to the Task area. Once you have added all your labels, it is time to explain to your interaction how to score. For a Drag and Drop in Lumi, you need to identify which labels should land in a drop zone for the interaction to be correct. Double-click the first drop zone, Espresso.
Since the correct label for this drop zone is "Espresso," click the checkbox next to that label.

I prefer arranging the content for an activity like this in a way that allows users to view everything at once. This way, users can easily review the information if they don't recall something immediately. It can be frustrating to navigate back and forth between activity elements to find details you might not remember from earlier.
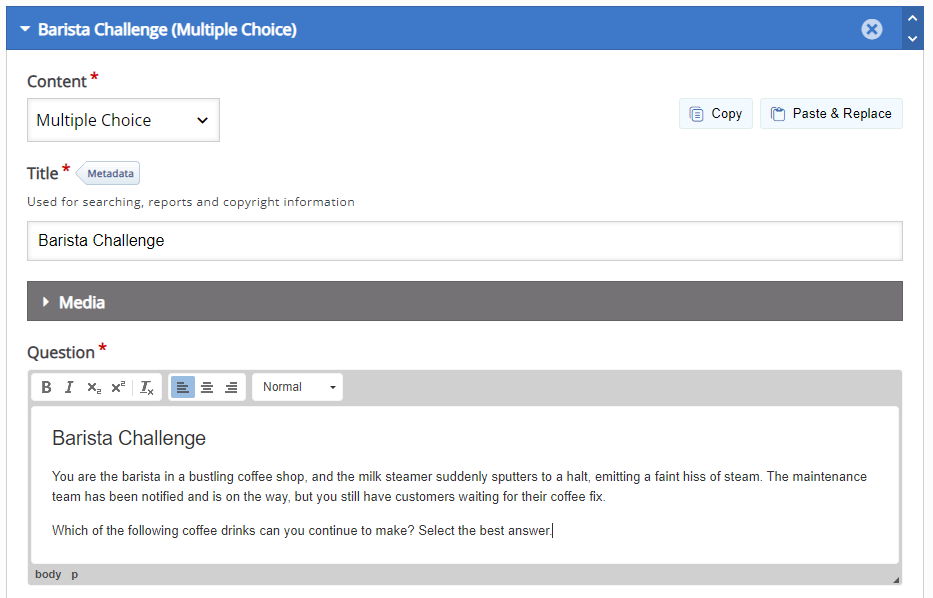
Activity 3: Apply What You've Learned
In the last section, we will ask more detailed questions, allowing the user to put their acquired knowledge into practice. In this scenario, you are a barista in a coffee shop, and the milk steamer stops working. You will have to decide which coffee drinks you can continue making without the steamer. I will create a multiple-choice question, but the activity can be anything that builds on the knowledge the learner has already acquired.
Select Multiple Choice from the content drop-down menu, then fill in the text for the question.
Next, you will fill in the answer options, adding more options as needed.
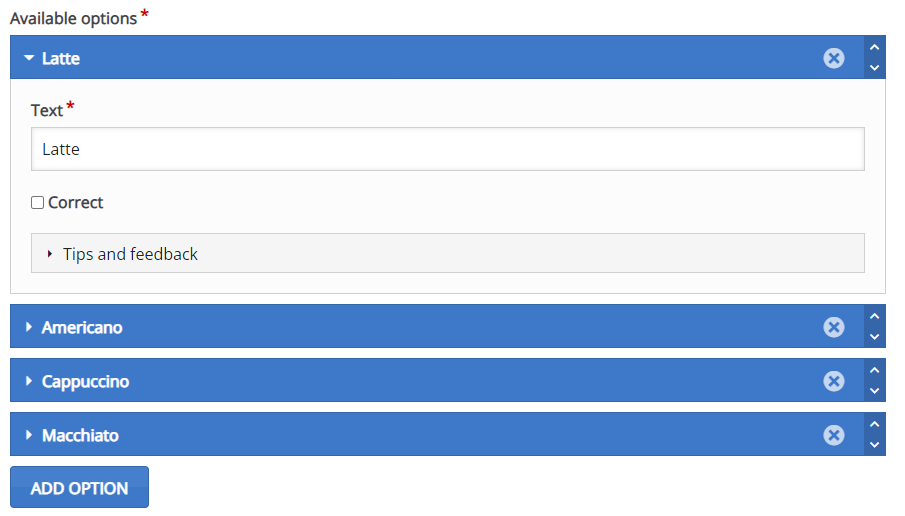
Finally, let's add feedback to explain why this is the correct answer.

Notice you can also add tips that appear before the user checks the answer, giving them time to change their response.
For the last part of the module, I like to write a quick summary of the material and the key points. Ideally, this will be a statement that, while elegantly simple, leaves an indelible imprint on the mind. This concluding paragraph should encapsulate the entirety of the discourse while resonating with an aura of profound inspiration. However, nothing comes too readily to mind.
Conclusion
I hope this crash course in microlearning and coffee has helped you navigate your caffeine or instructional design challenges. My biggest struggle when first using Lumi was learning how to manipulate the image sizes so they would fit properly in the exercises. I also struggled a bit with navigating through the Drag and Drop Task. Following the order that Lumi recommends is important since you must create all the drop options before creating the labels and assigning them to the correct locations. I hope that sharing my experience will make your challenges lighter.
You can view and share the finished microlearning activity here:.
About Lisa Stringer
Lisa Stringer is a digital learning designer at Award Solutions, where she creates stories to help people learn more about technology topics like Python, cyber security, and 5G.
About Award Solutions, Inc.
Award Solutions is the trusted training partner to the world's best networks. We help companies tackle new technologies by equipping their teams with knowledge and skills. Award Solutions invests heavily in technology, research, engineering, and labs to ensure our customers make the most of their resource and network investments.
Award’s expertise extends across many technologies including 5G/LTE Access 5G/4G Core, VoNR/VoLTE, Transport Networks, Telco Cloud, Virtualization and Orchestration, Data Automation, and more.